orgasmodelaboca
Follow us on
  • Home
  • Olives
  • Renegade Dinners
    • La Jefa
    • Current Renegade Dinners
    • Previous Events
  • Babbledyblog
  • Contact
  • Press

Just In Time For Summer! Matzoh Bawl Soup-you can smell the sarcasm

6/15/2011

0 Comments

 
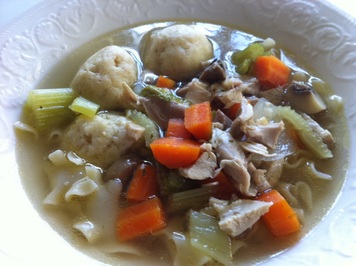
I know my timing is a just a wee bit off with this one, but I got sick last night and the only thing I wanted this morning was this heavenly healer. I have made this soup a hundred times in my life as an honorary Jew...bestowed upon me by two of my closest friends...not to mention all the ones I've tasted from many delis and none of the bowls ever compared to this. It could just be the fact that I felt like doodoo and just needed some warm nourishment, but after having 4 bowls over the l I have chosen to write and post this whilst it is still fresh in my memory, which gets worse as each day passes, so here it is  
Picture

Super easy! 1 1/2 hours total time
6 chicken thighs-bone in
6 ribs of celery
1 sweet onion-halved then quartered
8 mushrooms-halved then sliced thick
2 parsnips-peeled and sliced
3 carrots-peeled and chopped in 1/2" pieces 
6 sprigs fresh thyme
1 small can chicken broth
1pack matzoh ball mix
2 eggs for mix
half a pack of egg noodles
salt and pepper to taste

In a soup pot place first eight ingredients and cover with water by about 3".  Add salt and pepper and bring to a simmer.  Meanwhile, in a smaller pot get water boiling for balls and noodles.  Make matzoh balls by directions on package and set aside.  Top off pot with more water and boil noodles to aldente and rinse with cold water when done. Set aside.

Let soup simmer for about an hour, removing celery so that it does not overcook and turn to mush...who like mushy celery.  I also remove the chicken thighs and set them aside to cool.  Let soup continue to simmer as you dice up chicken and celery ribs.  Turn off soup, adjust seasoning with salt and pepper, and place celery and chicken back in pot.  Put a couple balls and some noodles in a bowl and ladle the soup over.  Enjoy!!  

I wait until the soup has cooled to put noodles and balls together so they don't overcook.
Optional is fresh parsley, which I would have put in but forgot at the market.
0 Comments

Sea Salt Caramel Panna Cotta

4/11/2011

0 Comments

 
Picture


I had my 7 course Orgasmo de la Boca aphrodisiac dinner this weekend and it was unanimous... my panna cotta was the best ever.  So here is the recipe!

3/4 cups milk
2 1/2 teaspoons powdered, unflavored gelatin
1 cup sugar
1/2 cup water
2 1/2 cups heavy whipping cream
1 teaspoons vanilla extract or half vanilla bean
1/2 teaspoon sea salt

You may use any type of mold for these.  You may pour directly into serving dishes, ramekins, muffin tins or cake pans.  If you plan to unmold your panna cotta like I have, you must lightly oil your molds.
 
Put milk in small bowl and set aside.  Put sugar and water in a very clean, medium size sauce pan over medium high heat.  Bring to a caramel stage, swirling pan occassionally so sugar does not crystallize on sides.  Caramel stage is between 320-350 degrees.  For this Panna Cotta I prefer a darker, richer caramel flavor..about 340.  When sugar reaches desired temperature add heavy cream a little at a time, using a whisk to incorporate.  At this time add your gelatin to your milk and let stand 5 minutes.  Add your salt to the caramel cream and bring back up to heat to dissolve salt.  Whisk your milk and gelatin mixture into pan and remove from heat.  Pour mixture into a blender and pulse on low to incorporate gelatin fully, being extremely careful not to add too much air.  You do not want it to froth*.   Pour into your desired mold and refrigerate for 24 hours.  

To unmold, place in warm water for about 20-30 seconds and invert onto dish.

*If it your mix has gotten to much air, you can let it sit for a few minutes or use a spoon to remove foam from top before pouring into mold. 
Serve with chocolate covered frozen bananas!

Photo courtesy of Tricia Romano!
0 Comments

The Perfecting of Baba Ghanouj

2/28/2011

0 Comments

 
Picture
So, I am a huge fan of the baba and make it on occasion, usually with not so great results.  I have looked at a gazillion recipes online and just never seem to get it right.  Well, this time I decided to NOT look at any recipes and just THINK about it before starting.  I like my baba super creamy and extra smoky, so I thought real long and hard like about it from a science standpoint and I did it.  There were three main tricks to getting the baba just right and here is my first recipe ever posted on my website.  I hate writing recipes, so you won't see many of them here.  I would rather come to your house and personally show you how to make something because it usually takes me less time and effort than to actually write a recipe.  It's all about technique people, unless we are baking.  

First I will tell you the 3 main tips for the perfect baba.  
1.  Pearce skin of eggplant generously.
2. Roast over your open flame at a lower temperature for a longer time...about 20 minutes.
These first two steps allow for maximum smokiness.
3. Let cool, then gently peel away charred skin and let liquid drain in colander.  This is to keep the baba from getting runny.  
Picture
Here you go!  Yeild- 2 cups baba 
1 large eggplant
1 large clove garlic
1 Tablespoon lemon juice
1/3 cup tahini-make sure to stir up your tahini well
1/8 teaspoon cayenne
salt to taste-and no I am not giving you exact measurements as it's a matter of taste, so don't ask me!

Complete first 3 steps from above.  Put all ingredients in a food processor and blend until smooth.  Now, this is a perfect recipe for my taste, but you may now take this opportunity to tweak it to your taste. You want it creamier..add more tahini. More acidic...add lemon..blah blah blah. You get the point.  Like I said, it's all about the technique.  

I will be enjoying this with some grilled paprika chicken with pickled radishes and turnips on pita.  How do you like to eat your baba?
0 Comments

Hors D´ouevres-Paprika Chicken with Pickled Radish and Baba Ghanouj

2/28/2011

2 Comments

 
Now that you have my amazing baba ghanouj recipe, let's learn another recipe and make a really amazing appetizer with it.  
Picture
These tasty little bites are made with my baba recipe, some pita chips, and my really easy and scrumptious pickled radish recipe.

For the pickled radish
2 cups radishes-trimmed and cleaned
1/2 cup white vinegar
1/4 cup rice vinegar
1/2 cup water
1 teaspoon coriander seed
1 tablespoon sugar
1 teaspoon salt
1 large clove garlic-sliced
Optional-1/4 cup chopped beet.  The beet gives it a little more color and a little earthiness to it.

Put all ingredients except radishes in a pot and let simmer for 10 minutes.  Put radishes in a jar and pour over pickling liquid.  Put lid on jar and keep in fridge for up to 2 weeks.

For the grilled chicken
2 boneless skinless chicken breasts
1 heaping tablespoon paprika
2 tablespoons honey
olive or grape seed oil to coat
salt and pepper to season

Put all ingredients in to bowl and toss to coat chicken well.
Grill over high heat for good sear and caramelization of sugars then reduce heat and cook to perfection.  Look!  When I was in cooking school and I asked my chefs "how long" or "when is it done"  I always got "when it's done" or "when it's perfect"  I would give you more specific times, but every grill is different and your breasts might not be the same size as mine. (insert beavis and butthead laugh here)  You get the idea.  
When chicken is cool, dice into small 1/4" pieces or thinly slice into bit size pieces.  You may bind diced chicken with a wee bit of mayonaisse..and I mean just a wee bit. Place a dollop or slice of chicken on pita chip and top with a dollop of baba and sliced pickled radish.  

You may use store bought pita chips or you can make fun ones like mine using fresh pita and a mini muffin tin.  I used a thin, Lebanese pita cut into triangles.  I then pressed the pita into the mini muffin tin and bake in a 350 degree oven until crispy.  These can be done ahead of time and kept in an airtight container in the freezer for up to a week.


2 Comments

    Author

    Alessandra has been a professional chef for almost 22 years and cooking for 28. These are her not so deepest thoughts!

    Categories

    All
    How To 101
    My Favorite...
    Rants And Raves
    Recipes
    Sassy Babble

    Archives

    November 2012
    March 2012
    June 2011
    April 2011
    February 2011
    January 2011

    RSS Feed

Powered by Create your own unique website with customizable templates.