orgasmodelaboca
Follow us on
  • Home
  • Olives
  • Renegade Dinners
    • La Jefa
    • Current Renegade Dinners
    • Previous Events
  • Babbledyblog
  • Contact
  • Press

Best Ever Split Pea, Ham, and Caramelized Brussel Sprout Soup

11/16/2012

1 Comment

 
Picture
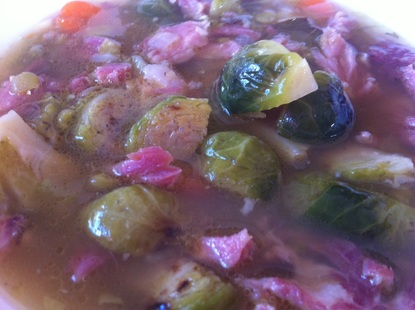
In preparation for the holidays, I was cleaning out my freezer and came across a vacuum sealed ham hock from a ham last year, so I decided to make the usual ham and split pea soup. With just a couple extra steps and a little added love, it turned into one of the best soups I have ever made. So, here you go...

1 ham hock, with bits. If you don't have a hock with bits, buy a ham steak to add
1 lb bag of green split peas, rinsed
1 lb brussel sprouts, end trimmed and quartered
3 carrots, sliced
1 onion, diced
2 ribs celery, chopped
1 head garlic, peeled and chopped
4 bay leaves
1 Tbsp bacon fat, olive oil if you don't have bacon fat

Place carrot, onion, celery, and chopped garlic in large pot over medium heat with a bit of oil..any will do. Saute for about 5-8 minutes until slightly translucent taking care not to burn garlic.  Add ham hock, split peas, and bay leaf and cover with water and bring to a simmer.

Meanwhile, put bacon fat in medium saute over medium-high heat and add brussel sprouts. Sprinkle with a bit of salt and pepper and toss every minute or so. When pan starts to caramelize, deglaze with a bit of water or any kind of stock. Do this 2-3 times till you have a nice brown glaze on brussel sprouts and set aside.

When peas are soft, remove hock and allow to cool. Add sprouts to soup and clean ham off bone and add to soup. Adjust seasoning if needed. I only had to add pepper to my soup due to the saltiness of the ham.
1 Comment

Chocolate Banana Almond Cake with Chocolate Ganache

3/3/2012

2 Comments

 
Picture
I don't bake much because I live alone and don't want to weigh 500lbs so I get very excited when I have friends coming over to share my sweet tooth. This morning I happened to have a few over ripe bananas on my counter and had a craving for chocolate so I googled "chocolate banana desserts" and one of the first things that came up is a cake. Now, I never follow a recipe, even when it comes to pastry and I always have a bit of nervousness as something is cooking as to whether or not the "artistic" changes I made will work out with the science of baking. The changes I made were nothing spectacular or mind blowing, but the result was one of the tastiest desserts I have ever made or eaten. 

Chocolate Banana Cake
2 cups sugar
1 3/4 cups flour
3/4 cups cocoa powder
1 1/2 teaspoons baking soda
1 1/2 teaspoons baking powder
3 medium eggs-called for two
1 1/2 cups milk-I used almond milk
3 mashed bananas-it called for two, I had 3
1/2 cup melted butter-it called for corn oil or vegetable oil
1 teaspoon almond extract
1 teaspoon vanilla extract
1/2 cup chocolate chips-added cuz I like my cakes extra rich and moist

Chocolate Ganache
9 oz bittersweet or semi sweet chocolate
1 cup heavy cream

1 cup slivered or sliced almonds

Chocolate Banana Cake: Preheat oven to 350 degrees F (180 degrees C) and place rack in the center of the oven. Butter, or spray with a non stick vegetable spray, 10 round or square cake pan

In a large bowl whisk together the sugar, flour, cocoa powder, baking powder, and baking soda. Set aside.

In another large bowl, whisk together the eggs, mashed bananas, water, milk, oil, and vanilla extract. Add the wet ingredients to the dry ingredients and stir, or whisk, until combined. You will notice that the batter is quite thin. Pour the batter into the prepared pan and bake for about 35 to 40 minutes or until a toothpick inserted in the center of the cake comes out clean.  

Remove from oven and let cool on a wire rack. When completely cooled, frost with the Ganache.

Ganache: 
Place the chopped chocolate in a medium sized stainless steel, or heatproof bowl. Set aside. Heat the cream and butter in a medium sized saucepan over medium heat (can also be heated in the microwave). Bring just to a boil. Immediately pour the boiling cream over the chocolate and allow to stand for 5 minutes. Stir until smooth. When Ganache has completely cooled, beat until soft and fluffy (I use a wire whisk). Then spread the frosting on top of the cake. Sprinkle with toasted almond slivers. 

2 Comments

Just In Time For Summer! Matzoh Bawl Soup-you can smell the sarcasm

6/15/2011

0 Comments

 
I know my timing is a just a wee bit off with this one, but I got sick last night and the only thing I wanted this morning was this heavenly healer. I have made this soup a hundred times in my life as an honorary Jew...bestowed upon me by two of my closest friends...not to mention all the ones I've tasted from many delis and none of the bowls ever compared to this. It could just be the fact that I felt like doodoo and just needed some warm nourishment, but after having 4 bowls over the l I have chosen to write and post this whilst it is still fresh in my memory, which gets worse as each day passes, so here it is  
Picture

Super easy! 1 1/2 hours total time
6 chicken thighs-bone in
6 ribs of celery
1 sweet onion-halved then quartered
8 mushrooms-halved then sliced thick
2 parsnips-peeled and sliced
3 carrots-peeled and chopped in 1/2" pieces 
6 sprigs fresh thyme
1 small can chicken broth
1pack matzoh ball mix
2 eggs for mix
half a pack of egg noodles
salt and pepper to taste

In a soup pot place first eight ingredients and cover with water by about 3".  Add salt and pepper and bring to a simmer.  Meanwhile, in a smaller pot get water boiling for balls and noodles.  Make matzoh balls by directions on package and set aside.  Top off pot with more water and boil noodles to aldente and rinse with cold water when done. Set aside.

Let soup simmer for about an hour, removing celery so that it does not overcook and turn to mush...who like mushy celery.  I also remove the chicken thighs and set them aside to cool.  Let soup continue to simmer as you dice up chicken and celery ribs.  Turn off soup, adjust seasoning with salt and pepper, and place celery and chicken back in pot.  Put a couple balls and some noodles in a bowl and ladle the soup over.  Enjoy!!  

I wait until the soup has cooled to put noodles and balls together so they don't overcook.
Optional is fresh parsley, which I would have put in but forgot at the market.
0 Comments

Sea Salt Caramel Panna Cotta

4/11/2011

0 Comments

 
Picture


I had my 7 course Orgasmo de la Boca aphrodisiac dinner this weekend and it was unanimous... my panna cotta was the best ever.  So here is the recipe!

3/4 cups milk
2 1/2 teaspoons powdered, unflavored gelatin
1 cup sugar
1/2 cup water
2 1/2 cups heavy whipping cream
1 teaspoons vanilla extract or half vanilla bean
1/2 teaspoon sea salt

You may use any type of mold for these.  You may pour directly into serving dishes, ramekins, muffin tins or cake pans.  If you plan to unmold your panna cotta like I have, you must lightly oil your molds.
 
Put milk in small bowl and set aside.  Put sugar and water in a very clean, medium size sauce pan over medium high heat.  Bring to a caramel stage, swirling pan occassionally so sugar does not crystallize on sides.  Caramel stage is between 320-350 degrees.  For this Panna Cotta I prefer a darker, richer caramel flavor..about 340.  When sugar reaches desired temperature add heavy cream a little at a time, using a whisk to incorporate.  At this time add your gelatin to your milk and let stand 5 minutes.  Add your salt to the caramel cream and bring back up to heat to dissolve salt.  Whisk your milk and gelatin mixture into pan and remove from heat.  Pour mixture into a blender and pulse on low to incorporate gelatin fully, being extremely careful not to add too much air.  You do not want it to froth*.   Pour into your desired mold and refrigerate for 24 hours.  

To unmold, place in warm water for about 20-30 seconds and invert onto dish.

*If it your mix has gotten to much air, you can let it sit for a few minutes or use a spoon to remove foam from top before pouring into mold. 
Serve with chocolate covered frozen bananas!

Photo courtesy of Tricia Romano!
0 Comments

The Perfecting of Baba Ghanouj

2/28/2011

0 Comments

 
Picture
So, I am a huge fan of the baba and make it on occasion, usually with not so great results.  I have looked at a gazillion recipes online and just never seem to get it right.  Well, this time I decided to NOT look at any recipes and just THINK about it before starting.  I like my baba super creamy and extra smoky, so I thought real long and hard like about it from a science standpoint and I did it.  There were three main tricks to getting the baba just right and here is my first recipe ever posted on my website.  I hate writing recipes, so you won't see many of them here.  I would rather come to your house and personally show you how to make something because it usually takes me less time and effort than to actually write a recipe.  It's all about technique people, unless we are baking.  

First I will tell you the 3 main tips for the perfect baba.  
1.  Pearce skin of eggplant generously.
2. Roast over your open flame at a lower temperature for a longer time...about 20 minutes.
These first two steps allow for maximum smokiness.
3. Let cool, then gently peel away charred skin and let liquid drain in colander.  This is to keep the baba from getting runny.  
Picture
Here you go!  Yeild- 2 cups baba 
1 large eggplant
1 large clove garlic
1 Tablespoon lemon juice
1/3 cup tahini-make sure to stir up your tahini well
1/8 teaspoon cayenne
salt to taste-and no I am not giving you exact measurements as it's a matter of taste, so don't ask me!

Complete first 3 steps from above.  Put all ingredients in a food processor and blend until smooth.  Now, this is a perfect recipe for my taste, but you may now take this opportunity to tweak it to your taste. You want it creamier..add more tahini. More acidic...add lemon..blah blah blah. You get the point.  Like I said, it's all about the technique.  

I will be enjoying this with some grilled paprika chicken with pickled radishes and turnips on pita.  How do you like to eat your baba?
0 Comments

Hors D´ouevres-Paprika Chicken with Pickled Radish and Baba Ghanouj

2/28/2011

2 Comments

 
Now that you have my amazing baba ghanouj recipe, let's learn another recipe and make a really amazing appetizer with it.  
Picture
These tasty little bites are made with my baba recipe, some pita chips, and my really easy and scrumptious pickled radish recipe.

For the pickled radish
2 cups radishes-trimmed and cleaned
1/2 cup white vinegar
1/4 cup rice vinegar
1/2 cup water
1 teaspoon coriander seed
1 tablespoon sugar
1 teaspoon salt
1 large clove garlic-sliced
Optional-1/4 cup chopped beet.  The beet gives it a little more color and a little earthiness to it.

Put all ingredients except radishes in a pot and let simmer for 10 minutes.  Put radishes in a jar and pour over pickling liquid.  Put lid on jar and keep in fridge for up to 2 weeks.

For the grilled chicken
2 boneless skinless chicken breasts
1 heaping tablespoon paprika
2 tablespoons honey
olive or grape seed oil to coat
salt and pepper to season

Put all ingredients in to bowl and toss to coat chicken well.
Grill over high heat for good sear and caramelization of sugars then reduce heat and cook to perfection.  Look!  When I was in cooking school and I asked my chefs "how long" or "when is it done"  I always got "when it's done" or "when it's perfect"  I would give you more specific times, but every grill is different and your breasts might not be the same size as mine. (insert beavis and butthead laugh here)  You get the idea.  
When chicken is cool, dice into small 1/4" pieces or thinly slice into bit size pieces.  You may bind diced chicken with a wee bit of mayonaisse..and I mean just a wee bit. Place a dollop or slice of chicken on pita chip and top with a dollop of baba and sliced pickled radish.  

You may use store bought pita chips or you can make fun ones like mine using fresh pita and a mini muffin tin.  I used a thin, Lebanese pita cut into triangles.  I then pressed the pita into the mini muffin tin and bake in a 350 degree oven until crispy.  These can be done ahead of time and kept in an airtight container in the freezer for up to a week.


2 Comments

Aprhodisiacs for Freaks

2/14/2011

0 Comments

 
Picture
From Grimoire's Black Book, Middle Ages
Burdock seeds in a martar pounde them.  Add of three-yeris-old goat ye lefte testycle and from ye back heris of whyte whelpe on e pynche of poudre, ye heris to be cutte on ye firste daye of ye newe mone and burne on ye seventh daye.  Infuse alle ye items in a bottel halfe fylled with brandye.  Leve uncorked twenty-one dayes to receive astral influence.  Cook on ye twenty-firste daye until ye thicke consistency is reched.  Add four droppes of crocodyle semen an passe throgh a fylter.  Rubbe mixture on genitalia and await ye result.

Lucayos Cook Book, 1660
To increase Ye Powers..
Take a Cock-Sparrow and pluck it whilst living, then throw it to ten wasps who will sting it to death.  Add the intestines of a Black Raven and Oil of Lilac plus Chamomile.  cook all in Beef-Fat until the flesh is in shreds.  Put into a bottle and hold near for use.  Ye shall see Marvels

American Negro Folklore
Place a live frog in an anthill and leave until the ants have cleaned the bones; then take the heart shaped bone and the hook-shaped bone;  keep the first yourself but hook the second in the clothing of a loved one.

A 17th Century Aphrodisiac Rump of Beef
Take a rump of beef and season it with nutmegs grated, and some Pepper and Salt mingled together, and season the beef on the bony side;  lay it in a pipkin with the fat side downward.  Take three pints of Elder-wine vinegar, and as much water, and three great onions, and a bunch of rosemary tied up together:  put them all into the pipkin, and stew them three or four hours together with a soft fire, being covered close.  Then dish it up upon sippets, blowing off the fat from the gravy;  and some of the gravy put on the beef, and serve it up.

An Ancient Chinese love potion
Pound the shell of a male venus's comb (a mullosk) to a very fine powder, add some urine, and let stand for three days, after which time put it out at noon to dry in the sund.  Then dip this in donkey-water and allow it to steep another threee days.  Again let it dry in the noonday sun and then sprinkle it lightly with the dew of flower blossoms; this will disperse the odor of the urine.  Drink from the solution at the time of copulation and you will be endowed with extraoridinary potency. 
0 Comments

Cooking with Love 101

1/25/2011

0 Comments

 
Picture
Some people eat to live, some people live to eat...and then there are the people who just have no idea what they are doing.  Whether you love your body or you love food, you aren’t going to be happy unless you can understand what it is to “cook with love”.  Thank the lard I am here to explain how to make sweet love in the kitchen.  It is THE most essential ingredient to any good meal and we all know what a good meal can lead to!

There are two basic ways of making sweet love in the kitchen.  There is the spontaneous “quickie” where you are using ingredients that you just had laying around the pantry and the fridge, waiting patiently for someone to caress them.  Then there is the well thought out “can’t walk the next day” session.  This is where you spend some serious time menu planning, shopping, prepping, cooking, setting of the table, shining the silverware kind of lovemaking.  They are both equally good and satisfying, but I tend to prefer the “can’t walk the next day” to the “quickie” only because I am a chef and a major stickler for detail.  So with that being said, let’s focus on the “can’t walk the next day” kind of love.

Menu planning is like foreplay in the kitchen…shopping in LA on the other hand is like a bad kisser…you work with what you’ve got but it can be a major turn off.  I usually start each meal inspired by one sole ingredient, whether it be a spice, a veggie, or a protein of some sort.  I like to peruse my cookbooks and magazines searching for something that I haven’t used in a while or that I know is in season.  Once I find that one thing that has gotten my juices flowing, I decide what kind of ethnic “position” I want to take.  Am I in the mood for some spicy Mexican or Thai lovemaking?  Some sweet and salty Japanese?  Some romantic slow Caribbean or maybe I will just let the ingredient dictate.  Just take yourself to the market and start with that ingredient and go with it.  Either way, you must take your time choosing just the perfect tools to use to cook with love.   Before I start, I like to explore my ingredients.  How do they like to be cooked?  How many different ways can I arrange them on a plate?  Once I begin the preparation, I really like to taste everything as I am going along.  This builds excitement and anticipation and allows you to adjust your seasonings.  Don’t just follow a recipe.  This is the very first thing to remember when cooking with love.  You are solely responsible for your ingredients and that means putting in the effort to make that food your bitch!  Any Neanderthal can follow a recipe, but it’s the understanding of the ingredients that brings the love.  Everything else should come naturally.

Now, when cooking with love it is also essential to have a good setting.  Setting the table is equivalent to the lighting of the candles and putting on just the perfect music part of the lovemaking process.  .  DO NOT wait until the last minute to set your table.  You don’t light the candles when you are done with the lovemaking; you do it before to add to it!  If you take the time to do the setting right, it only adds to what happens in the kitchen. You wouldn’t serve a fine wine out of a plastic cup or a tasty rack of lamb on a paper plate would you?  I also find this essential when it’s just a “quickie”.   You will feel the love much more if it’s eaten in a beautiful setting.  Those people who actually eat in fast food restaurants are beyond my help, I fear.

Plating of the food is also a very important part to cooking with love.  You want the food to look enticing.  You want your guest or guests..If you’re into that sort of thing…to ooh and ahh.  Food always tastes better if it looks amazing.  It is psychological.  Just like when that super hot guy was better than you thought he was…just because he was soooo HOT!  Food is that way too.  BUT, if you put enough love into it, you can’t go wrong.

So these are the basics to cooking with love or making sweet love in the kitchen.  It’s not so much about the tools and techniques as it is about the attitude and effort.  Next time we will touch base on the quickie.  I know…you are asking yourself why didn’t I start with this because it’s what most people are used to.  I guess I am just trying to inspire you to spice it up a bit!  Get those creative juices flowing people!
0 Comments

Bacon 20 Ways

1/25/2011

1 Comment

 
Picture
Pork...Praise the Lard!!


  1. Sauteed bacon
  2. crack bacon-contact for details
  3. chicken fried bacon
  4. peanut butter bacon cookies
  5. bacon bourbon brittle
  6. bacon chocolate
  7. bacon dressing
  8. bacon necklace
  9. bacon lollipop
  10. BLATito
  11. bacon hot sauce
  12. bacon flavored condoms
  13. bacon bundt cake
  14. maple bacon banana bread
  15. bacon bra-for humor and aesthetics only
  16. bacon rolling papers---IF ONLY!!
  17. bacon stuffed loin of pork wrapped in bacon
  18. Bacon breath mints
  19. bacon filled lucite bowling balls
  20. bacolyte plastiques-the wave of the future...and you always wondered what to do with all that leftover bacon fat!
1 Comment

Making Bacon...What NOT To Do!

1/25/2011

3 Comments

 
Picture
Let me just preface this by saying it isn't rocket science. 

So, for the Holidays this past year I did not have one party to cater…thanks Mr. Government for sending the economy into a downward spiral…so I decided I was going to make some of my tasty treats to sell.  I stuck with a few of my tried and true, world famous delectables like my basil and vodka cured lox, and my Caesar salad dressing.  Then, I somehow got it into my head I was going to take local, organic pork bellies and make smoked apple wood and pepper bacon.   I am not here to tell you how to do it, but more like how NOT to do it.   It wasn’t a disaster so to speak.  Everyone but me seemed to love it in the end.  Let’s just say it didn’t go as smoothly as I planned.

 I think it all started by going the wrong way on the freeway to pick up the pork bellies.  I usually have an acute sense of direction, but not on this day.  When I got the pork bellies home there was one main issue with them that turned out to be huge in the end.  They weren’t whole pork bellies.   They had been cut into pieces for packaging purposes.   This left the bellies in strange shapes and sizes, which lead to the next issue; getting them to cure evenly.   I wound up with 9 different pieces of belly to equal 30lbs.  It also still had the skin on.  Now, most of this is my  responsibility for not asking all the right questions.  It took me forever to find a local place to get them and I was so excited to find them finally that I jumped the gun a little. 
Let’s jump forward 7 days.  All seemed nice and kosher,(HA!!) until I found out from one of my purchasers of said bacon that she needed them by a certain date.  This meant I was going to have to stay up after work and smoke them in the dark.  Note to self:   invest in headlamp.   Now, during the week while the bacon was curing I was also making jam, smoked olives, Caesar salad dressing, candied spiced nuts, gravlax, spice rubs, and working full time at my usually part-time job.  I was exhausted and barely able to stand when it was time to smoke the bacon.   I smoked it for 5 hours at 150 and just figured it was time for it to come out.  In the dark and half asleep I pulled it off the smoker and attempted to take the skin off while it was still warm.  I was just tooooo tired and decided I would deal with it in the morning. 

 The next day I packed it all up in the car, along with my vacuum sealer and headed off to work to slice and package.  This is when I perform my second attempt to take the skin off.  FUUUUUNNNKKKKK!!  I am just still too tired and have no patience for this.  I get the skin off one of them and throw it on the slicer.  It is at this point that I realize I haven’t smoked it long enough and gotten it to the right temperature and I need to cook it some more.  I am aware as a chef this could be a dangerous venture and I do spend about the next hour on the internet doing some research on what to do.   In the end, I decide to bring it up to a certain temp in the oven.  This seems to go well and when it comes out I easily remove the skin with my sharpest knife.  .  It is also at this point that I call said purchaser and let her know that there is no way in hell it is going to be ready in time and what can I do in place of the 5lbs she wanted. 

 After the bacon has chilled sufficiently in a very cold fridge overnight, I pack it all back up in the car and head back to the slicer.  Oh, it is soooo pretty…and tasty.   There is just only one thing wrong.  I am losing way too much of it to scrap because of the way it was cut.  I start to panic as I see my now 26lbs of bacon dwindling.  I am cursing the person who cut this into so many pieces and myself even more for buying it like this.   I get down to my last slice of bacon and get a whopping 17lbs in the end.  Exactly what I needed to fill my existing orders after the 5 lbs I didn’t have ready.  This seems to be the only highlight of the whole experience.  That and everyone else seems to have really enjoyed it.  I have yet to try any of my bacon except for the miniscule piece I cooked when I first started slicing it.

So in review, let’s just go over the do’s and don’ts

  • Do ask many questions when speaking to suppliers
  • Don’t get it with the skin on.  It’s just another step to the process.
  • If you have to, do take it off while it is still warm
  • Don’t multitask 10 other things during this process.
  • Do sit down and take deep breathes and gather your thoughts.
  • Don’t try and smoke it at 8 o’clock at night after working since 7am. 
  • Don’t finish it in your oven unless you want your house to smell like smoke for the next 2 weeks.
  • Don’t guarantee a certain amount if you don’t know how much you are going to have. 
  • Do ask me how to make bacon.  I can now tell you exactly what to do and what can go wrong and what to do if it does go wrong.
 I hope you all can learn something from my mistakes.  I know I have!
3 Comments
<<Previous

    Author

    Alessandra has been a professional chef for almost 22 years and cooking for 28. These are her not so deepest thoughts!

    Categories

    All
    How To 101
    My Favorite...
    Rants And Raves
    Recipes
    Sassy Babble

    Archives

    November 2012
    March 2012
    June 2011
    April 2011
    February 2011
    January 2011

    RSS Feed

Powered by Create your own unique website with customizable templates.